How to Plan a Trip on Google My Maps: A Step-by-Step Guide

Learn how to plan a trip on Google My Maps with this step-by-step guide! This is the process we use as full time travellers for our travel itineraries and trip planning. Easily customise routes, save locations, and organise your travels like a pro.
A question we have been asked often during our full time nomadic retirement travels is how we plan our trips and itineraries. Sadly, there is no one magic solution for this as travel planning takes lots of time and research, especially when you are travelling on a budget like we do.
The one thing we love about travel is planning! We love reading and researching about others adventures and watching travel vlogs by some of our favourites. We keep lots of notes and top-tips on accommodation, locations to stay, recommended restaurants and meals, regional foods to try, and of course, must-see locations and top tips on how to visit these sights.
We have been travelling now since January 2018 so we have worked out a few short-cuts along the way to make this easier and less time-consuming. Planning current and future trips with Google My Maps is one of our favourite and most recommended tools!
Google My Maps allows you to create and share custom maps with multiple layers, complete with location pins, icons, and notes. Plus, since your custom map syncs with the Google Maps app, you can easily access and navigate it while on the move.
Are you currently planning your next trip? Read on for our step-by-step guide on how to plan a trip using Google My Maps trip planner. We will show you just how easy it is to map out an itinerary for your next travel adventure!
N.B. We also use Google My Maps for recording our research and ideas for future travel destinations as we come across it. This allows us to store all the information we have gathered in ne place along with notes on each pin.
Planning a Trip on Google My Maps: Key Takeaways
If you’re in a hurry, here’s a quick overview of why and how we use Google My Maps for our travel planning:
- Create and Customise Your Map – Start by opening Google My Maps, creating a new map, and adding custom layers to organise your trip details.
- Add and Categorise Locations – Pin key destinations, such as hotels, attractions and restaurants, and categorise them using icons, colours, and notes for easy reference.
- Plan Routes and Directions – Use the built-in route tool to map out walking, driving, or public transport directions between locations for a seamless itinerary.
- Share and Collaborate – Share your map with fellow travellers, allowing them to view, edit, or contribute to the itinerary in real time.
- Access and Use Offline – Download your map for offline use to ensure you can navigate your trip without needing an internet connection.
Why Do We Use Google My Maps For Our Travel Itinerary Planning?
We have tried and tested a number of websites, tools and apps for planning our trips, but we have found Google My Maps to be the best tool for us. We love it and recommend you try it because:
- Google My Maps is free to use
- It is really easy to use
- The pins of all of your must-see places, restaurants etc. can easily be seen visually on the map
- Personal notes on individual pins can be added during planning i.e. cost of entrance, opening times, food recommendation in a restaurant etc.
- You can categorise and personalise your map to help visually i.e. pin colours and icons
- Using layers allows you to further organise your trip – this is especially useful when you break your trip down day by day
- Google My Maps trip planning helps you plan and map out your own self-guided walking / cycling routes and road trip itineraries by adding directions between your pinned locations
- My Maps stores a copy of the map in your Google Drive account
- Your map can be added to and edited at any time from your desktop
- Share your map with family and friends
How to Plan a Trip on Google My Maps
Most people are familiar with Google My Maps and have used it at some time or another to find a location and navigate to it. However, most people do not know that you can actually brainstorm your ideas for future trips AND plan your itinerary on Google My Maps!
We no longer have the chaos of storing our future travel ideas by having websites bookmarked, Pinterest Pins saved in folders, Facebook Posts saved, and copy and pastes of taking notes from YouTube videos. Google My Maps is the place we store ideas for all our future trips!
So, this is the step-by-step procedure we use to save our ideas and plan our trips, along with some additional features you may also find useful for customising your map. Feel free to change around the order and develop a method that works best for you!

Step 1: Sign-In to Google My Maps
Go to the main Google My Maps page and sign-in with your Google username.
Step 2: Create A Travel Map
To create your map:
- Click on ‘Menu’ on the top left (3 horizontal lines)
- Click on ‘Your places’
- Click on ‘Maps’ (4th tab across the top)
- Click on ‘Create Map’.
Step 3: Add a Title and Description to Your Map
Name your map and add a description by clicking on ‘Untitled map’ in the top left corner.
Step 4: Add a Title to Your Layer
Name your map / layer i.e. name of country or city, City-Day 1 etc. by clicking on ‘Untitled layer’ half way down in this box.
N.B. This step can also be done after you have added all your pins to develop layers and help categorise your trip further.
Step 5: Add Your Must-See Locations
This is the part we most enjoy as we can start adding all the must-visit locations, restaurants, hotel recommendations etc. we have found through our research on travel blogs and vlogs, YouTube, Lonely Planet, Google, Facebook Groups and friends recommendations.
Search your destination / individual must-see locations, restaurants, bus / train stations etc. in the search bar and click on ‘Add to map’ on the bottom left of the pop-up screen. It will now appear under the city / layer description on the left side of the screen and as a pin on the map.
And as a bonus, you now have the address, phone number and website links for all your pins in case you need it.
N.B. If you can’t find the name of a place (i.e. hotel, monument, restaurant) when searching on Google My Maps, use the ‘Add marker’ feature and drop a labelled pin icon in the location.
Step 6: Organise Your Pins Into Order
Once you have added all your pins, you can reorganise these into a logical order on the left had side screen by simple dragging and dropping.
Step 7: Save
Now, click on the ‘Save’ button and you have created your first map on Google.
It really is as simple as that!
Top Tip: The key to using this tool effectively is to choose a system that works for you and helps you stay organised. Once you have decided on your system, use it consistently for every additional map you create!
Additional Features on Google My Maps to Make Your Map More Informative
However, if you want to make your map even more informative and functional, here are some additional steps that we take using the additional features on Google My Maps.
Feature 1: Colour Code Your Pins According to Different Categories
We colour code and categorise our pins by colour so we can easily identify each and this also helps us with planning our day i.e. where to stop for food. For example, this is how we colour code our categories:
- Must-See Locations / Sights – Red
- Areas / Neighbourhoods – Purple
- Transportation Stops i.e. Ferry / Cruise Ports, Train Stations, Bus Stations – Yellow
- Beaches – Teal
- Restaurants, Coffee Shops and Bars – Green
- Accommodation – Orange
- Shopping Areas – Pink
How To Do:
- Click on the pin that you have added to the map
- Click on ‘Style’ (first icon) at the bottom of the pop-up (looks like a paint can)
- Choose your colour
N.B. This is how we colour code our map, however, create a colour coding system that works for you. We have also seen it done as a priority system where green is ‘must see’, orange is ‘like to see’ and yellow ‘if have time’. We have also seen maps colour coded according to the daily schedule i.e. Day 1 – Red pins, Day 2 – Green pins etc.
Top Tip: Blue is hard to see on Google My Maps due to the background, so try and pick another brighter colour.
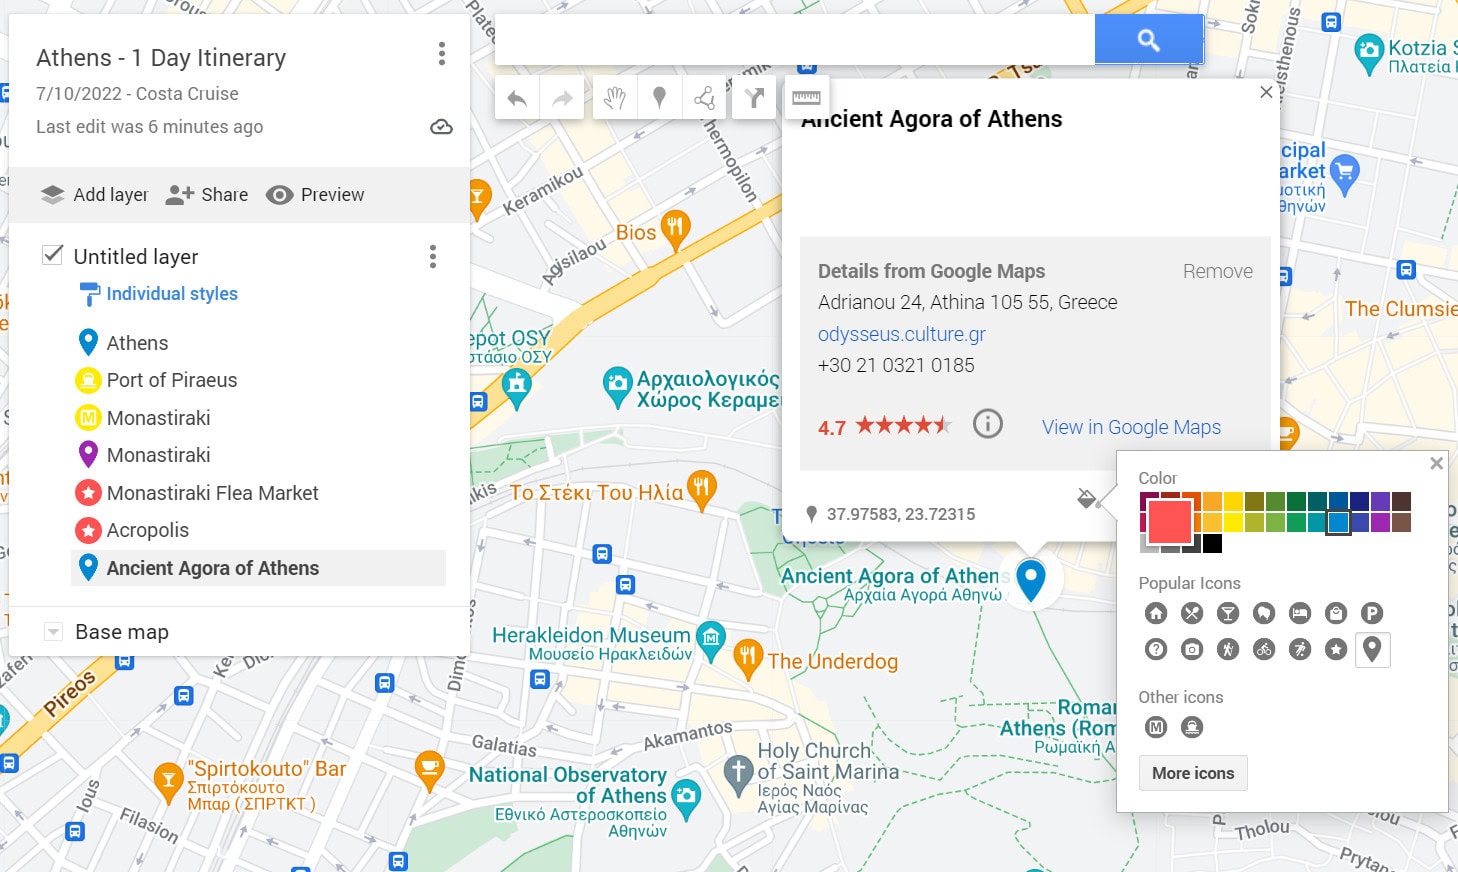
Feature 2: Add Icons to Your Pins According to Different Categories
In addition to colour coding our pins by colour, we also add an icon to further categorise them to enhance identification at a glance. For example, this is what we do:
- Must-See Locations / Sights – Star
- Areas / Neighbourhoods – General Pin
- Transportation Stations / Stops – Ferry, Train, Metro, Bus
- Beaches – Beach Umbrella
- Restaurants, Coffee Shops and Bars – Crossed Knife and Fork
- Accommodation – House
- Shopping Areas – Shopping Bag
How To Do:
- Click on the pin that you have added to the map
- Click on ‘Style’ (first icon) at the bottom of the pop-up (looks like a paint can)
- Choose your icon from ‘Popular Icons’ or ‘More Icons’
N.B. If you make a choice from the ‘More Icons’ section, your personal choices will start to appear under ‘Other Icons’ so you do not need to keep going back in and finding the ones you use often.
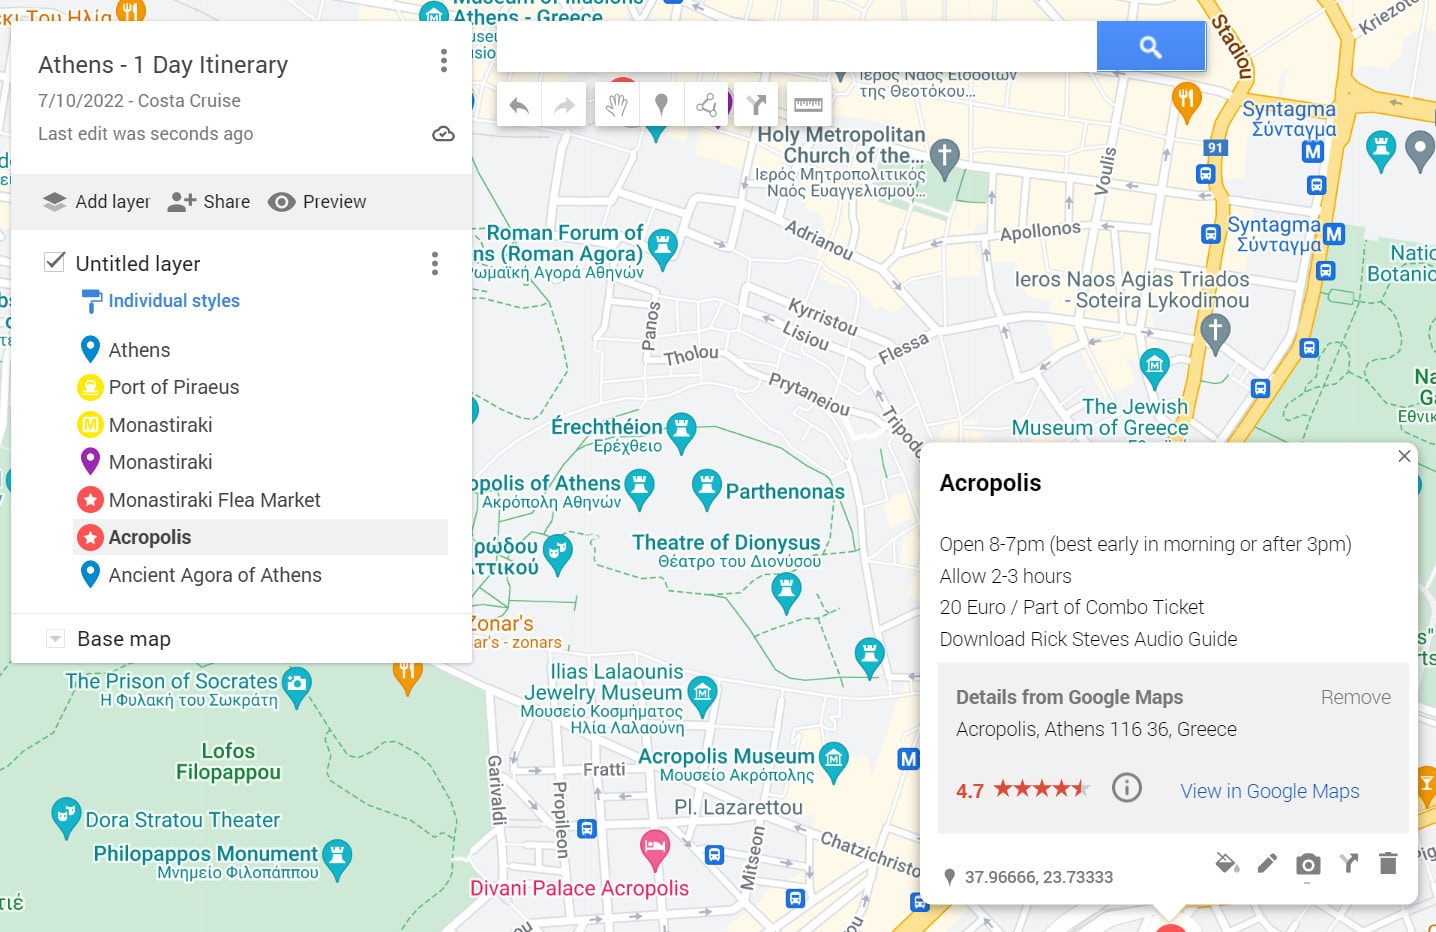
Feature 3: Add Descriptions / Extra Information to Each Pin You Add
We like to add additional information under each pin such as the entrance cost of an attraction, opening times, how long to visit, top tips, meal recommendation at a restaurant etc. These appear under the title of your pin when you click on it.
How To Do:
- Click on the pin that you have added to the map
- Click on ‘Edit’ (second icon) at the bottom of the pop-up (looks like a pen)
- Add extra information to text box
Top Tip: To start a new line of text, click on ‘Ctrl’ + ‘Enter’, and the cursor will move down a line.
Feature 4: Add Images / Videos to Each Pin You Add
On occasion, we add photos to our map to help us identify a specific point of interest or something special that shouldn’t be missed. This can be useful for recognising the fronts of restaurants.
How To Do:
- Click on the pin that you have added to the map
- Click on ‘Add image or video’ (third icon) at the bottom of the pop-up (looks like a camera)
- Upload, drag and drop images, or insert URL
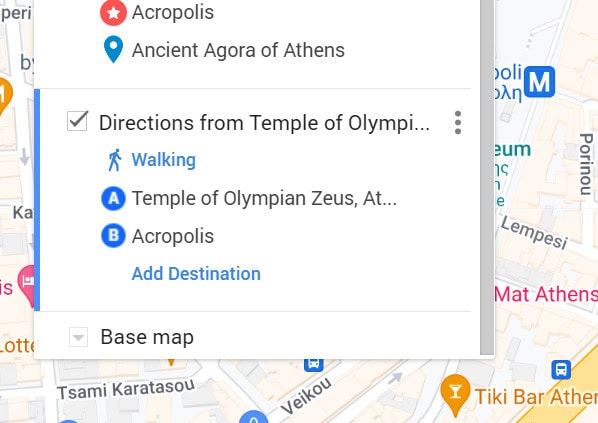
Feature 5: Find Directions from Point A to Point B
This is a great feature and one we use extensively to help us see which attractions are within easy walking distance of each other to help us plan our route.
How To Do:
- Click on the pin that you have added to the map
- Click on ‘Directions to here’ (fourth icon) at the bottom of the pop-up (looks like an arrow)
- Input your Point A and Point B
- Click on ‘Driving’ and change for walking or cycling
- Click on ‘Layer options’ (three vertical dots)
- Click on ‘Step-by-step directions’ to see the exact distance in metres, the approximate time it will take to walk, the exact directions

Feature 6: Create Walking / Cycling Routes and Road Trips
Once we have added our pins and checked distances between them, we then add our own route.
How To Do:
- Click on ‘Draw line’ (fifth icon) at the top of the page under the search bar (looks 3 dots with lines between)
- Click on the option that applies:
- Add line or shape
- Add driving route
- Add biking route
- Add walking route
Once you’ve made your selection, click ‘Add direction’.
This will automatically add a new layer to your map that you can easily access later. After that, all you have to do is type in your Point A and Point B destinations.
You can add up to 10 stops along the way, which you can always update, rearrange, or change later. If you want to alter the route, just drag the little white circle to the road or route you prefer.
You’re probably already used to calculating drive times with Google My Maps, but did you know you can do the same with walking and cycling routes?
Just click the three little dots beside the direction name and select ‘Step-by-step directions’. This will provide you with a complete breakdown of travel time in minutes between each stop and the distance.
Feature 7: Delete a Pin
How To Do:
- Click on the pin that you have added to the map
- Click on ‘Delete Place’ (fifth icon) at the bottom of the pop-up (looks like a trash can)
Feature 8: Create Different Layers in Your Map
This is a useful feature if you want to have a separate daily itinerary or individual city / region planner in a country, and have your map looking more organised. Also, layers can be turned on and off at anytime so only the relevant pins can be seen on your map.
How To Do:
- Click on ‘Add layer’ (first icon) on the grey tool bar under the title of the map (looks like a diamond with a shadow)
- Pins will be added to the selected layer on the screen on the left, and you can drag these to any layer at any time
N.B. Only 10 layers can be created so at times you will need to be clever with how you use your colour and icon categorisation system.
Feature 9: Share Your Map / Itinerary With Your Family or Friends
How To Do:
- Click on the pin that you have added to the map
- Click on ‘Share’ (second icon) on the grey tool bar under the title of the map (looks like person with a + sign beside)
- Copy the link and email to your friends and family
Feature 10: List Pins and Descriptions Into a Spreadsheet
This is another feature of Google My Maps for those that prefer the visual ease of spreadsheets. Here you can add descriptions / extra information under the ‘Description’ column to be saved on your pin. This is an alternate way of adding additional information as described in Feature 3 above.
How To Do:
At the top of your layer on the left pop-up screen:
- Click on the three vertical dots on the right side
- Click on ‘Open data table’ (fourth icon) at the bottom of the pop-up (looks like an arrow)

Feature 11: Import Locations from a Spreadsheet
You can also import locations and information from a spreadsheet, CVS or KML/KMZ files directly into Google My Maps / your itinerary. This is not a function we have used, however, here is a link on how to import map data.
Feature 12: Print Your Map
How To Do:
- Click on the three vertical dots on the right side beside your map title
- Click on ‘Print map’ and select paper size, orientation and output type.
Using Google My Maps to Plan a Trip / Travel Itinerary / Store Ideas
So, as we have mentioned above, everyone plans their travels a little differently. Your travel plan can also be affected by a number of things such as:
- Which city or country?
- How much time do you have? Days, weeks or months?
- What is your budget?
- How will you travel around i.e. walking, car, metro, bus, airplane?
- What are your must-see locations / sights and things to do?
However, no matter how you plan your travels, you will find trip planning using Google My Maps super easy! And…. You can access your Google My Maps itinerary anywhere at any time while out and about.
Now it is your turn…. Just remember it gets easier the more you use it and once you have created your own personal customisation scheme with colour coding pins and adding icons, it becomes even more informative.
Enjoy your travel planning and creating a trip in Google Maps!
How To Export Your Google My Maps Route to Your Phone to Use Offline
Once you have your trip planned for your destination, the next step is to export data from Google My Maps to use on your phone offline while you are out and about exploring. Read our next blog post for step by step guidance on how we do this…
FAQ’s: Planning Your Travels on Google My Maps
Now that you have read how we plan all our current and future travels on Google My Maps, you might still have a few questions. Don’t worry, we’ve got you covered! Here are some frequently asked questions about more specific uses and ways to use its features.
How do I get directions between locations?
Click on a location, select “Add directions,” and choose your transportation mode. Google My Maps will generate a route between your selected points.
Can I use my Google My Maps offline?
Google My Maps itself requires internet, but you can export your map as a KML/KMZ file and use it in offline-friendly apps like Organic Maps. Read this post: How to Export Data From Google My Maps to Use Offline on Organic Maps on Your Phone for the workaround.
How do I share my trip plan with others?
Click “Share” in the top right, adjust permissions (view or edit), and send the link to your travel companions for easy collaboration.
Can I import data from other sources?
Yes! You can import KML/KMZ, CSV, or XLSX files to add pre-existing locations, waypoints, or routes to your Google My Maps.
What is the maximum number of layers you can add to a map?
You can add up to 10 layers per map to organize locations, routes, and categories effectively.
How many location markers can be placed in each layer?
Each layer can hold up to 2,000 location pins, allowing detailed trip planning with multiple stops and points of interest.
Does Google My Maps have a dedicated mobile app?
Google My Maps does not have a dedicated app, however, you can view your maps within Google Maps as long as you are logged in to the same account.
Does Google My Maps include a bridge height filter?
No, Google My Maps does not have a bridge height or truck route filter. It’s best to use dedicated motorhoming and trucking apps for such features.
How does Google My Maps differ from Google Maps Lists?
Google Maps Lists store simple location collections, while Google My Maps allows full customization with layers, routes, and custom markers.
What is the limit on stops in a directions layer?
You can add up to 10 stops per route on a directions layer, making it useful for multi-stop travel planning.
Can you use the directions layer for navigation on a phone?
No, Google My Maps doesn’t provide real-time navigation. However, you can export locations to Google Maps for turn-by-turn guidance.
Does Google My Maps show estimated travel time for directions?
Yes, but only in the Directions layer—Google My Maps estimates travel time based on the selected transportation mode.
Can you create or edit maps from your phone?
No, Google My Maps can only be created or edited from the desktop version of the site.
In Summary – How to Plan a Trip In Google My Maps
We have found Google My Maps travel planner to be an amazing tool! Not only will it help you to store ideas for future trips and plan where you want to go, but it assists you to create a map of your travels for your itinerary. From there you can visually see your itinerary map to further assist with your day-to-day travel plan.
The other feature we really love about Google My Maps travel planning is adding useful information to each pin so we know how much we should be paying to enter, opening and closing hours, which meal is highly recommended to order etc. Having this information readily available further improves our whole travel experience.
Are you planning a trip in the near future? Have you used Google My Maps for travel planning before, or have we missed any Google My Maps itinerary planning features we should add to this post? Feel free to contact us on Facebook or via email and let us know.
Planning Your Travels: Related Blog Posts
Want more info to help you with your travel planning? Check out all the articles we’ve written about how we do it and the ‘Best of World Travel’ in all parts of the world, and continue planning for your next trip.
TRAVEL PLANNING IN GENERAL
- How to Pick a Travel Destination: 13 Factors to Consider (Learn From Our Mistakes)
- 9 Best Travel Planning Apps Every Traveller Should Know
- How to Plan a Trip on Google My Maps: A Step-by-Step Guide
- How To Export Data From Google My Maps To Use Offline
BEST COUNTRIES TO TRAVEL TO IN…
JANUARY | FEBRUARY | MARCH | APRIL | MAY | JUNE | JULY | AUGUST | SEPTEMBER | OCTOBER | NOVEMBER | DECEMBER
BEST FESTIVALS AROUND THE WORLD IN…
JANUARY | FEBRUARY | MARCH | APRIL | MAY | JUNE | JULY | AUGUST | SEPTEMBER | OCTOBER | NOVEMBER | DECEMBER
FESTIVALS IN…
DISCLAIMER: This article contains affiliate links and Exit45 Travels are a participant in the Amazon Services LLC Associates Program. That means if you click a link and make a purchase, we make a small commission at no extra cost to you. Please see our disclosure policy for more information.